 LYNX SHARE
Exporting
Render the song to audio, stems or MIDI, or save it for another DAW.
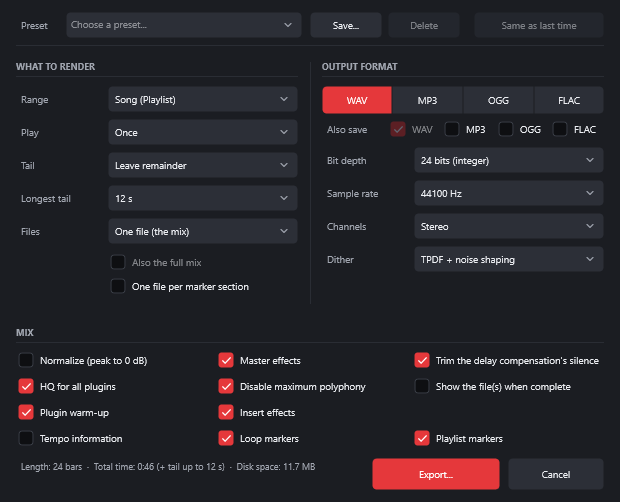
Everything that leaves LYNX SHARE goes through File › Export. The audio formats (WAV, MP3, OGG and FLAC) share one export window. MIDI, FL Studio projects, Ableton Live sets and zipped projects have their own entries in the same menu.
Export the song as a WAV
- Choose
File › Export › Wave file.... - Leave
RangeonSong (Playlist)andFilesonOne file (the mix). - Pick a
Bit depth: 16 bits, 24 bits or 32 bits (float). - Set
TailtoLeave remainderso reverbs and releases ring out after the last bar. - Click
Export..., choose a name and a folder, and wait for the render. - When it is done, LYNX SHARE reports where the file went and its peak level.
Ctrl+R opens the window with the format you exported last. Ctrl+Shift+R opens it on MP3.
What to render
| Setting | What it does |
|---|---|
Range | Song (Playlist), Current pattern or Playlist selection |
Play | How many times the range plays in the file, from Once to 16 times |
Tail | Cut remainder stops exactly at the end. Leave remainder lets the sound ring out. Wrap remainder mixes the tail into the start, for loops |
Longest tail | 3, 6, 12 or 30 seconds. The tail stops earlier when the sound has faded out |
Files | One file, or stems (see below) |
Output format
The four buttons choose the format. Also save writes other formats from the same render, with the same name.
| Format | Options |
|---|---|
| WAV | Bit depth: 16 bits, 24 bits or 32 bits (float). Dither: Off, TPDF or TPDF + noise shaping |
| MP3 | Bitrate, constant |
| OGG | Bitrate |
| FLAC | Bit depth, Compression from 0 (fastest) to 8 (smallest), Dither. Lossless at every level |
Sample rate and Channels apply to every format. Channels is Stereo, Mono (both sides mixed), Mono (left only) or Mono (right only).
Mix options
| Setting | What it does |
|---|---|
Normalize (peak to 0 dB) | Raises or lowers the whole file so its loudest peak reaches full scale |
Master effects | Off: the Master insert's effects are bypassed |
Insert effects | Off: the effects of the other inserts are bypassed |
HQ for all plugins | Plugins use their render quality. Off: the export uses the playback quality |
Plugin warm-up | Third-party plugins process a moment of silence before the export starts |
Disable maximum polyphony | Lifts the channels' voice limit, so no note is cut |
Trim the delay compensation's silence | Removes the silence that plugin latency compensation adds at the start |
Tempo information, Loop markers, Playlist markers | WAV only: store the tempo, the loop and the Playlist's markers in the file |
Show the file(s) when complete | Opens the file manager on the result |
Stems and tracks
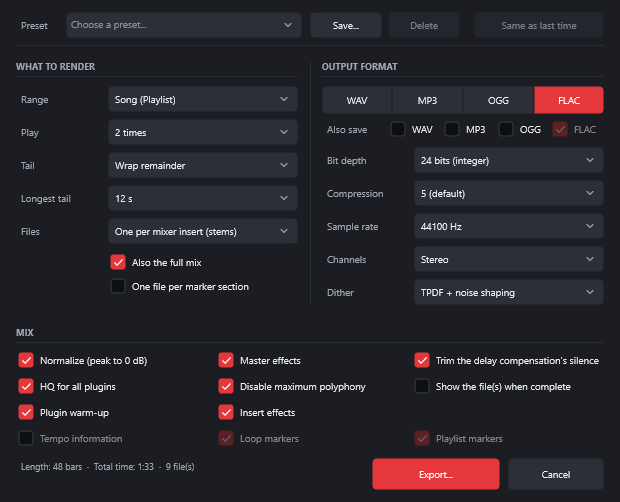
Files has three stem modes:
One per mixer insert (stems): a file for each insert that gets sound.One per channel (stems): a file for each channel that plays.One per channel, instruments only (no sends or buses).
Tick Also the full mix to get the mix next to the stems. The line at the bottom shows how many files will be written.
File › Export › All playlist tracks and All playlist track groups write one file per Playlist track or per group. In the Mixer's menu, Disk recording › Render armed tracks to wave file(s)... (Alt+R) opens the export window for the armed inserts only.
Other entries of the Export menu
| Command | Key | What it does |
|---|---|---|
MIDI file... | Ctrl+Shift+M | Writes the notes as a standard MIDI file (.mid) |
Master... | Ctrl+Alt+M | Renders the project and masters it to a loudness target in LUFS, on your computer |
Project with samples (.zip)... | none | The project and its samples in one archive |
FL Studio project... | none | An .flp, or a zipped loop package with every sample |
Ableton Live set (.als)... | none | A set for Live 12 or Live 11 |
Project bones... | none | Channel and effect presets and scores, in a folder |
Exporting to FL Studio and Ableton Live
The .flp is an FL Studio 2026 project. Samplers, audio clips, FL Studio's own generators and effects, third-party plugins, patterns, the Playlist, the Mixer and automation go over with their settings. For the things FL Studio does not have, you choose between Render them to audio (sounds the same) and Use the nearest FL plugin (stays editable, may sound different). With the second choice, LYNX-only instruments are left out. Modulators are always left out. A report lists what was rendered, replaced or left out. Details are in Coming from FL Studio.
The .als holds a MIDI track per channel, audio tracks, groups, returns, sends, racks and Drum Racks, VST2 and VST3 plugins with their state, markers, and volume, pan and tempo automation. LYNX SHARE's own instruments and effects are not converted, though their tracks and notes are kept. Automation of effect parameters and insert-to-insert routes are dropped. Details are in Coming from Ableton Live.
Good to know
Ditheris greyed out for MP3, and the tempo and marker options are greyed out for every format but WAV.- With
Playlist selectionand no selection in the Playlist, the whole song is rendered. The window warns you. - If the Master insert is muted, the window warns that the file will be silent.
Also write a video with this mixappears only when the project has a video track, and it needs FFmpeg.Render through the hardware in real timeappears only when the project has an active hardware insert. That export takes as long as the song.- Render to audio, where an insert is bounced to an audio clip, plays about 5 dB louder than the insert it replaces in this version.