 LYNX SHARE
Your first song
From an empty project to an exported audio file, step by step.
This page walks once through the whole path: a drum pattern, a melody, an arrangement, a mix and an exported file. Each part links to the page that covers its window in full. If you hear nothing at any point, see Audio setup.
Make a drum pattern
- Choose
File › New from template › Empty. The project starts with five channels, Kick, Clap, Hat, Snare and Synth, and no steps. - Press
F6if the Channel rack is not showing. - Click some steps on the Kick row. Dragging draws several, and right-click erases.
- Press
Space. The transport is in Pattern mode, so the pattern plays in a loop. PressSpaceagain to stop. - Give the Clap, Hat and Snare rows their own steps.
- Press
F2to name and colour the pattern.
To add a sound that is not there, click the + add channel box under the last row and pick an instrument from the menu. To use a sample of your own, open the Browser with Alt+F8, click an audio file to hear it and double-click it to add it as a new channel.
Write a melody
- Press
F4. LYNX SHARE goes to the next empty pattern and asks for its name. - Right-click the Synth channel's name and choose
Piano Roll. - With the Pencil (
P), click in the grid to add a note. - Drag a note to move it and drag its end to change its length. Right-click deletes a note.
- Press
Spaceto hear the pattern while you edit.
Ctrl+T turns the typing keyboard into a piano, so you can try notes on Z to M and Q to P first. Turn it off again before you use letter shortcuts such as P.
Arrange the patterns
- Press
F5to show the Playlist. - In the Picker panel on the left of the Playlist, click the drum pattern. It is now the clip source.
- With the Pencil (
P), click on a track to place the pattern. Click again further right to place it again, or use the Brush (B) and drag to paint clips end to end. - Click the melody pattern in the Picker and place it on another track.
- Press
Lto switch to Song mode, thenSpace. The Playlist plays from the song position. Click the ruler to set it.
Mix it and add an effect
- Press
F9to show the Mixer. The five starting channels already play through inserts 1 to 5, and a channel added from the+ add channelmenu takes a free insert. The number in the channel's route box in the Channel rack says which one. - To move channels to free inserts of their own, select them in the Channel rack and press
Ctrl+L. Each insert takes the channel's name and colour. - Drag an insert's fader to set its level.
- Click an insert to select it. The effects panel on the right shows its ten slots.
- Click an empty slot and pick an effect. Click the slot's name to show or hide the effect's window. The slot's light bypasses the effect.
Export the song
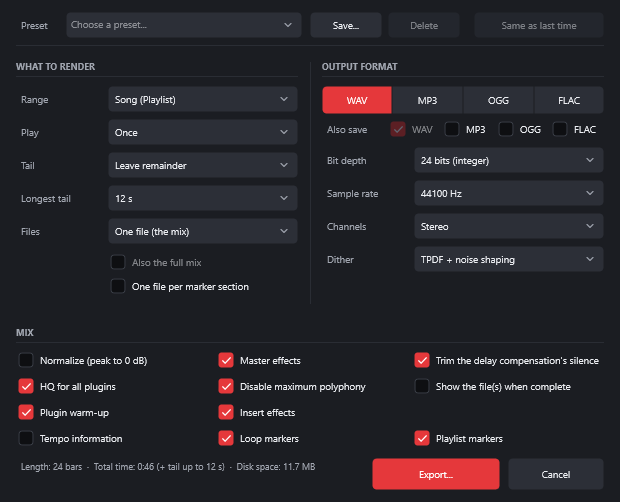
- Press
Ctrl+Sand save the project first. - Choose
File › Export › Wave file.... For other formats the same menu hasMP3 file...,OGG file...andFLAC file.... - Set
RangetoSong (Playlist). The other choices areCurrent patternandPlaylist selection. - Leave the other options as they are.
- Click
Export..., choose the file name and wait for the render.
What each key did
| Command | Key | What it does |
|---|---|---|
| Channel rack | F6 | Shows or hides the Channel rack |
| Next empty pattern | F4 | Goes to the next empty pattern and names it |
| Piano roll | F7 | Shows or hides the Piano roll |
| Playlist | F5 | Shows or hides the Playlist |
| Pattern or Song mode | L | Switches what Space plays |
| Mixer | F9 | Shows or hides the Mixer |
| Send to free inserts | Ctrl+L | Gives the selected channels their own Mixer inserts |
| Save | Ctrl+S | Saves the project as .lynx |
| Export | Ctrl+R | Opens the export window with the last used format |
Good to know
- In Pattern mode you hear only the current pattern. If the song is silent after arranging, check that the transport is in Song mode.
- The export window starts on
Song (Playlist)when the transport is in Song mode and the Playlist has clips. Otherwise it starts onCurrent pattern. - The metronome click is never part of an export.
- The foot of the export window shows the song's length in bars, its total time and the disk space the file needs.
- By default a new project has a Limiter on the Master insert. It is part of what you hear and what you export.
- Undo is
Ctrl+Z. Pressed again it redoes that step.Ctrl+Alt+Zgoes further back.