 LYNX SHARE
MIDI controllers
Play notes from a keyboard and link hardware knobs to controls.
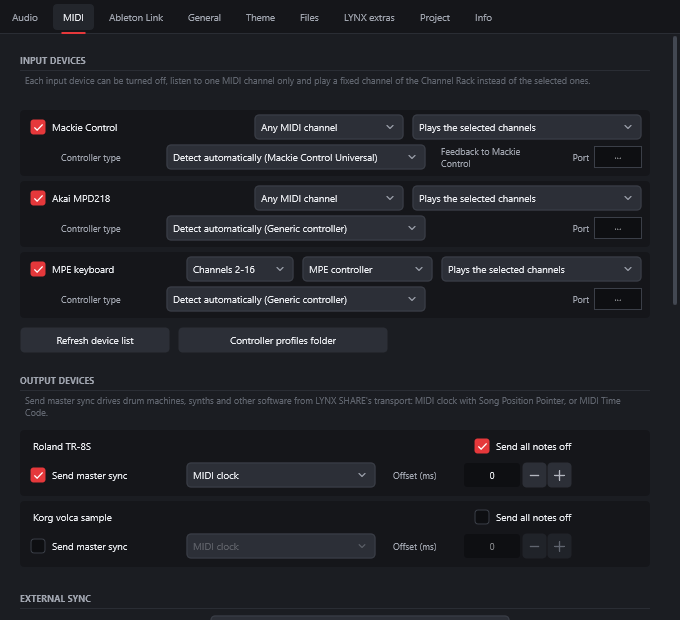
LYNX SHARE takes notes and controller moves from any MIDI input device. The devices are set up on the MIDI page of the settings: Options › MIDI settings..., or F10. Without hardware, the typing keyboard and the touch keyboard play notes too.
Connect a keyboard
- Plug the keyboard in and open
Options › MIDI settings...(F10). - Find it under
Input devicesand tick it. If it is not listed, clickRefresh device list. - Leave the two boxes on
Any MIDI channelandPlays the selected channels. - Close the settings and select a channel in the Channel rack.
- Play. The selected channel sounds.
Input devices
| Setting | What it does |
|---|---|
| Tick box | Turns the device on or off |
Any MIDI channel | Listens to every MIDI channel, or to one channel only. MPE controller is at the end of this list |
Plays the selected channels | Notes go to the channels selected in the Channel rack, or always to one fixed channel |
Velocity | As played, Soft (light playing sounds louder), Hard (needs harder playing) or Fixed (every note at full velocity) |
Performance mode channel | Notes on this MIDI channel launch Playlist clips while Performance mode is on |
Song marker jump | Notes on this MIDI channel move the song to a marker instead of playing |
Controller type | Detect automatically, Generic controller or a controller profile |
Foot pedal controls note off | On by default. A sustain pedal (CC 64) or a sostenuto pedal (CC 66) holds the notes. Off, the pedal goes to the plugins as a controller |
Link a knob to a control
- Right-click the knob or fader in LYNX SHARE.
- Choose
Link to MIDI controller (move a knob on the controller). - Move the knob or fader on your hardware. The link is made.
The link is saved with the project. To remove it, right-click the control again and choose Unlink controller. The menu item shows the CC number in use.
| Command | Key | What it does |
|---|---|---|
Link to controller... | none | Opens the Remote control settings window for the control, where you see and set its link by hand (below) |
Override global link... | none | Makes a link that works in every project. It is kept in the settings, not in the project |
Override global link... (for all projects: move a knob on the controller) | none | Makes a global link in one step: move the hardware control next. The item without the brackets opens the Global link settings window instead |
Remove global link | none | Removes it again |
Multilink to controllers | Ctrl+J | While it is on, the controls you move are linked, in order, to the hardware controls you move next. It is in the Options menu |
Pickup (takeover mode) | none | On the MIDI page. A controller moves a parameter only after reaching its current value, so nothing jumps |
The MIDI page lists the links under Links (this project, then global). A device whose Controller type is Generic controller does only what you link by hand.
A third-party plugin's parameters are reached through Automate plugin parameter in the channel's menu or the effect slot's menu. Each parameter there has the same link items. See Automation.
Remote control settings
Link to controller... opens this window, as in FL Studio. Global link settings (from Override global link...) has the same fields except the link list, Omni, the internal controller and Remove conflicts. A double-click on a link in the MIDI page's list opens it too.
| Setting | What it does |
|---|---|
Port, Channel, Ctrl | The MIDI input port number, the MIDI channel and the controller number. Right-click Ctrl for the standard controllers by name. Note C0 in that list makes a note link: turn the number up from there for another key |
Auto detect | On by default. Move a control on your device and the numbers are filled in |
Omni | The link follows the selected channel, or for an effect in a mixer slot, the selected mixer track |
Mode | How a note or button link acts. Default and Hold follow the key: its velocity while held, zero on release. Latch switches between the two ends on each press. Inc steps the value up on each press. Stay sets the velocity and keeps it after the release |
| Internal controller | Links the control to one of the project's internal controllers instead. Shown only when the project has one. Record automation lets that controller's moves be recorded as automation |
Mapping formula | How the input maps to the control, with the variable Input. Presets has FL's list of formulas. Press Enter to apply a formula you typed. The curve beside it shows the result |
Smoothing | Smooths the control's moves. Time sets how long: 1 pole for negative values, 3 poles for positive ones |
Remove conflicts | On by default. Removes other links that use the same controller when you click Accept. It turns red while there is such a link |
Reset, Skip, Accept | Accept saves the link (one undo step). With several controls queued by multilink, Skip goes to the next one |
Controller profiles
A controller profile sets up a device's transport buttons, faders, knobs, pads, lights and display, with nothing to link.
- Open
Options › MIDI settings...(F10) and tick the device underInput devices. - Leave its
Controller typeonDetect automatically. The name in brackets is the profile found from the device's port name. - If it shows
Generic controller, choose the profile from the list yourself. - Read the line beside the box.
Feedback tonames the output port that gets the lights, motor faders and display text.
| Profile | What it maps |
|---|---|
Mackie Control Universal | Faders to the inserts' volumes and the Master. V-Pots to pan, to the parameters of the selected channel's plugin or to the Channel rack's volumes. Arm, solo, mute and select per strip, fader banks, play, stop, record, rewind, forward, Pattern or Song mode, metronome, undo and the jog wheel. The display shows names and values |
Mackie Control Extender (XT) | The same for 8 more strips. The units share one bank, in the order of the Input devices list |
Novation Launchkey MK3 (DAW mode) | Pots to pan, volume or plugin parameters, faders to volume, fader buttons select an insert. Bank, play, stop, record, loop, metronome and undo buttons. The Session pads are the selected channel's 16 steps. Use it on the keyboard's second port |
Akai APC Key 25 mk2 | Knobs to volume, pan or plugin parameters. The two top pad rows are the selected channel's 16 steps and the three below play notes. Track buttons select an insert. Stop, play and record. Use it on the second port |
Arturia KeyLab Essential mk3 (Mackie Control port) | The Mackie Control map, on the keyboard's MCU/HUI port |
Korg nanoKONTROL2 (Mackie Control mode) | The Mackie Control map. It is not detected: start the unit in a Mackie Control mode and choose this type by hand |
Knobs and faders that send a position use soft takeover: they move a control only after reaching its value. Controls you linked by hand keep their links. Controller profiles folder opens the folder for your own profiles (*.lynxctl), and Refresh device list reads them again.
The built-in profiles were written from each maker's documentation. They have not been tried on the hardware yet.
MPE controllers
MPE is at a first stage. An MPE controller plays each note with its own pitch bend, timbre (CC 74) and pressure.
- On the MIDI page, open the device's box that reads
Any MIDI channeland chooseMPE controller. - In the box that appears beside it, choose the member channels, from
Channel 2toChannels 2-16. - Play. To record, see Recording.
- A recorded note keeps one value of each: its bend as fine pitch, its timbre as Mod X and its strongest pressure as Mod Y. It is not a curve.
- Of the built-in instruments, the Sampler and the built-in synth follow these values.
- A third-party plugin receives MPE when
MPEis on underMIDIin the plugin window'sWrapper settings. Each note then goes out on its own MIDI channel, 2 to 16. - It has not been tried with a real MPE controller yet.
MIDI Map Mode and Key Map Mode
In the Clip-launch workflow, clips, scenes and buttons can be mapped as in Ableton Live. The MIDI and Key buttons beside the Both, Grid, Song switch turn the modes on, as do Ctrl+M and Ctrl+K.
- Press
Ctrl+Mfor MIDI Map Mode, orCtrl+Kfor Key Map Mode. Every element that can be mapped is tinted, blue for MIDI and orange for keys. - Click an element: a clip slot, a scene, a track's stop button,
Stop all clips, play, stop, record,Session Record, the metronome, or a knob of the Session mixer or the Device View. - Move a control or press a key on your MIDI device, or press a computer key in Key Map Mode. The element shows its assignment, for example
1/19(channel and controller). - The mappings are listed in place of the Browser: Channel, Note/Control or Key, Path, Name, Min and Max. Drag Min or Max, or double-click to type a value. Right-click a row for
Invert RangeandDelete. - Press the same key again to end the mode.
The typing keyboard
Ctrl+T, or Options › Typing keyboard to piano, turns the computer keyboard into a piano. The rows from Z to M and from Q to P play the selected channels.
- While it is on, letter and number keys are notes. The single-letter tool keys of the Piano roll and the Playlist work only while it is off.
- It always plays at the Piano roll's velocity. The
Velocitysetting on the MIDI page is for MIDI devices. - The same switch is in
Options › General settings....
The touch keyboard
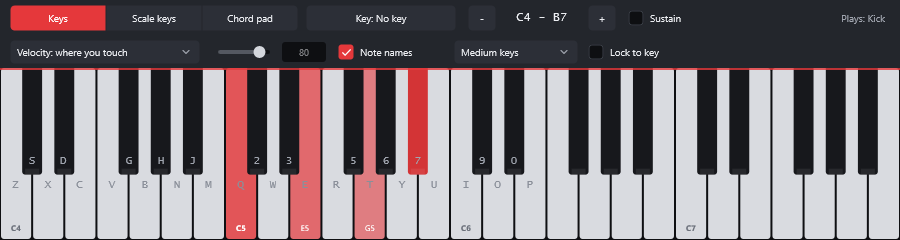
View › Touch keyboard (Alt+F7) opens a piano you play with the mouse or a touch screen. It plays the channel selected in the Channel rack, and shows its name at the right.
| Setting | What it does |
|---|---|
- and + | One octave down or up |
| Key size | Small keys, Medium keys or Large keys |
Velocity: where you touch | Near the top of a key plays soft, near the bottom loud |
Velocity: fixed | Every note at the velocity set with the slider |
Note names | Shows the names on the keys |
MIDI sync
Output devices on the MIDI page sends the transport to hardware and other software. Tick Send master sync for a device and choose MIDI clock (with Start, Continue, Stop and Song Position Pointer) or MIDI Time Code. Offset (ms) sends the sync later with a positive value and earlier with a negative one. Send all notes off sends that message to the device on init and after an export.
External clock sync works the other way: LYNX SHARE follows the MIDI clock of the input you choose, with its tempo, Start, Continue, Stop and Song Position Pointer. External sync offset (milliseconds) plays LYNX SHARE later with a positive value and earlier with a negative one. Status shows whether a clock is running.
Good to know
- Choosing an input for
External clock syncturns that device on underInput devices. - A tempo moved by a linked MIDI controller does not resize audio clips. Type or set the final tempo instead.
- To record what you play, see Recording. Incoming notes can be snapped to a scale in the Piano roll.
- MIDI CC, channel aftertouch and pitch bend sent to a plugin can be automated with
Automate MIDI controller (CC, aftertouch, pitch bend). - A note held by a pedal is recorded up to the moment the pedal comes up.
- An automation clip does not take a control back while you move it from a controller. The control follows its automation again when playback next starts.
- Note links made in
Remote control settingsare not written to a .flp export. Ctrl+MandCtrl+Kstart the map modes in the Clip-launch workflow only. Map Mode has no macro mapping or note ranges yet.